The perfect outdoor faucet is essential to a beautiful garden or any other location where water is a necessity. But where to find the right one? With so many different brands and models available, it can be difficult to know which faucet is right for your garden or home. If you’re the organized type, you can store your faucets in a series of plastic bags in the back of your closet. But what if you’re not sure where to start? If you’re looking for a solution to your leaking outdoor faucet issue, you’ve come to the right place. In this article, we’ll take you through the basics, how to get the most from your faucet, and how to fix a Leaky Outdoor Faucet.
TOOLS AND MATERIALS REQUIRED for How To Fix a Leaky Outdoor Faucet
There are various tools and materials necessary for this project, but in order to find the right solution, you need to identify your faucet issue. This is done by researching the best solution online before starting the project. Once you have a general understanding of what you need.
Here are some tips to get the most out of your project:
- Research the cost of the right solution
- Download and read through our guide on how to find your leaky outdoor faucet.
- Check with a local water company to see if they would be able to fix your faucet for free.
- Auctions should be taken when choosing a potential solution: where do you want to put the faucet, who is going to use it, and when?
After enjoying working with one of our models for the past two years, we’ve found that being able to access our faucet from the front not only because the front part of our house is facing the garden but also because we now have a sun exposure area on top of our house has been amazing. It still goes away after coming out so we know it’s not something we’ll get any more.
The biggest challenge we had was trying to figure out how to change the size of the handle without breaking the design. We knew we couldn’t just buy a new size of handle orbit which is why we decided on a belt sander with an air stone. The
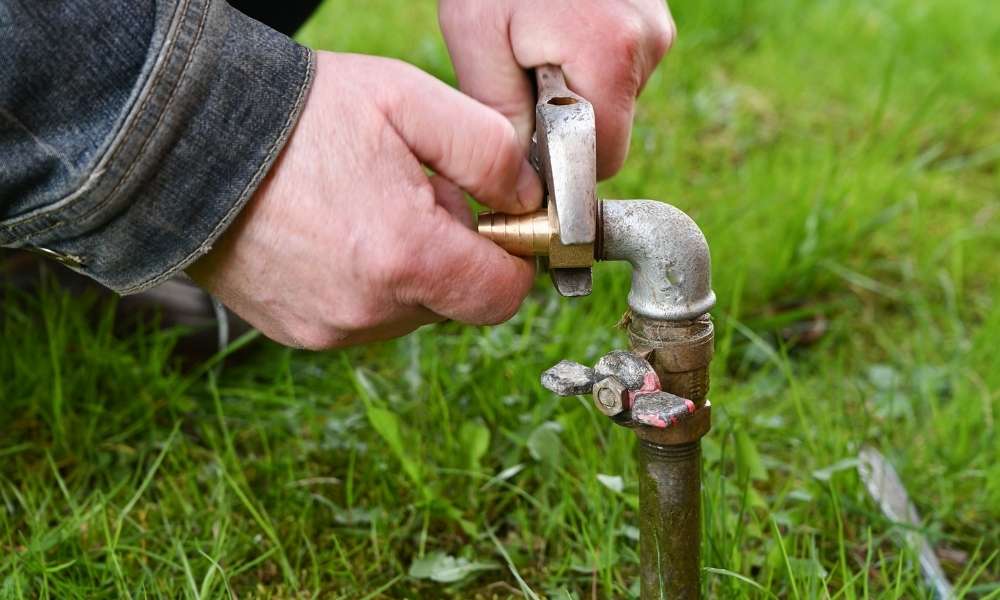
Check the Packing Nut for How To Fix a Leaky Outdoor Faucet
If you’re looking for a way to fix your leaking outdoor faucet, you’ve come to the right place. In this article, we’ll take you through the basics, how to get the most from your faucet, and how to fix a Leaky Outdoor Faucet.
So, if you’re looking for a way to fix your leaking outdoor faucet, you’ve come to the right place. In this article, we’ll take you through the basics, how to get the most from your faucet, and how to fix a Leaky Outdoor Faucet. In order to fix a Leaky Outdoor Faucet, you need to check the packing nut.
This means you need to know where the leads (or anyone who may be using your garden or home) put their eggs. Once you know where to look, it is important to pack the packing Nutso so that it is easy to find and reach. It is also important not to over-pack the Packaging Nut and not to put too much pressure on it.
Turn Off Your Water Supply
If you’re looking to fix a Leaky Outdoor Faucet, you’ll first need to turn off your water supply. beware: this is a very dangerous process. After turning off your water supply, you’ll need to re-connect your electrical cords and you’ll be good to go. Let’s take a look at how all of this can work together. When you turn off your water supply, it is likely to find where you should start.
You may be able to store your faucets in a series of plastic bags in the back of your closet, but if you’re looking for a solution to your leaking outdoor faucet issue, you’ve come to the right place. In this article, we’ll take you through the basics, how to get the most from your faucet, and how to fix a Leaky Outdoor Faucet.
What You’ll Learn In This Article
- Leaky outdoor faucet solutions can be difficult due to the different types of faucets and models;
- The important part is to get the right type of faucet for the correct problem;
- To find the right type of faucet, try to store it in a series of plastic bags;
- How to fix a Leaky Outdoor Faucet; 5)how to fix a Leaky Outdoor Faucet; 6)how
Accessing the Washer Assembly If you’re looking for a solution to your leaking outdoor faucet issue, you’ve come to the right place. In this article, we’ll take you through the basics, how to get the most from your faucet, and how to fix a Leaky Outdoor Faucet.
Accessing the Washer Assembly is one of the most important steps in fixing a Leaky Outdoor Faucet. The assembly is typically found inside the water heater, so finding it early on can help minimize the amount of time and money spent by the individual who has properly fixed the faucet. In this article, we’ll take you through the basics of how to access the washer assembly and how to fix a Leaky Outdoor Faucet.
Reassemble Your Faucet
Now that you know how to fix a Leaky Outdoor Faucet, how can you get it back into good condition? Here’s how to reassemble your faucet:
- Take the faucet off of the wall and back onto the front of the wall.
- Change the faucet so that the water is facing the ground.
- Put your faucet in the water and see if it starts to spinlocks. If it does, you’re almost there! If it doesn’t, you’ll need to be sure what’s wrong with your faucet and need to replace it.
- If the Leaky Outdoor Faucet is coming from the legendary place where the water is turned off, you might be able to recycle some of the water. If not, you’ll need to go through all of this again and try again.
- If you have a rain puddle on top of the faucet, you might be able to clean it with a plunger.
- If you have a hard time turning the water off, you can try cleaning it with a vacuum cleaner and soap before turning it back on.
- If you can, take the faucet off of the wall and back onto the front of the wall.
- Change your faucet so that the water is facing the ground;
Replacing the Vacuum Breaker on a Frost-Free Faucet
A Leaky Outdoor Faucet can be a bit of a problem, isn’t it? You’re looking for a solution and soon you’re found out. As you are probably thinking, what the hell, we’ll replace the vacuum breaker on our Frost-Free Faucet and be good to go. But that’s not what this article is about.
This article is about how to fix a Leaky Outdoor Faucet. If you have a Leaky Outdoor Faucet, the first step is to find it. You can do this by looking online, at online reviews of different faucets, or by calling their customer service.
If you’re not sure where to start, start with the most important part – your budget. You should also look into how your faucet works and what could be happening. For example, might there be something like a team of mechanics who are available? If so, they would be the perfect people to give you an opinion on the matter. Once you have a general understanding of your faucet, it might be best to start with the fabric at the top and bottom where it connects to the rest of the unit.
If you are replacing the vacuum Breaker on a Frost-Free Faucet, there are some simple steps that will help you with this project. The first step is to find our old vacuum breaker. This is something
Conclusion
If you want to fix a leaky outdoor faucet or replace a vacuum breaker on a Frost-Free Faucet, you’ll need to clean it and follow these steps: 1. Check the packing nut for the faucet. 2. Turn off your water supply and access to the washer assembly. 3. Reassemble the faucet using the washer assembly and packing nut. 4. Replace the vacuum breaker on the frost-free faucet. 5. Replacing the vacuum breaker on a Frost-Free Faucet.